
We will be making a ViewModifier that applies a cool rainbow gradient background animation. This modifier will easily turn any Shape, Text or View into a colorful experience.
The tools we will be using are:
- GeometryReader: A Container
Viewthat provides access to the parents size and bounds. - mask: A
ViewModifierthat uses another View to only allow the background view to shine thru where the mask has a fill or stroke.
Making The Gradient
Color Generation
First we need to make the colors that go into our LinearGradient. We can make use of our higher order functions stride and map.
let hueColors = stride(from: 0, to: 1, by: 0.01).map {
        Color(hue: $0, saturation: 1, brightness: 1)
    }
Explanation
Generally hue is specified as an angle in degrees [0˚, 360˚] or radians [0, 2π]. The hue value of Color is a bit different because it is normalized so that the maximum value is 1. Knowing this we use stride to generate an array of numbers between [0,1], and then use map to convert the to an array of different Colors
Linear Gradient
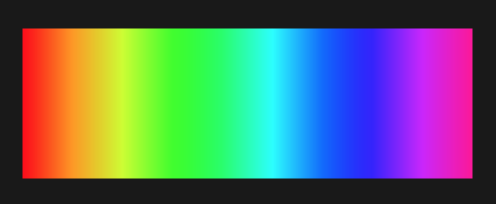
Then we use the hueColors to create a LinearGradient
LinearGradient(gradient: Gradient(colors: hueColors),
               startPoint: .leading,
               endPoint: .trailing)
You should see something like this when previewing the gradient
Masking
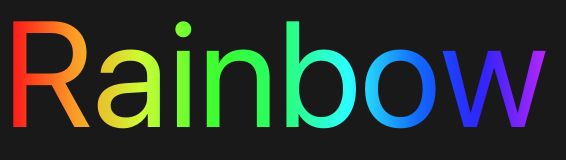
Now to create the text and apply it as the mask
LinearGradient(gradient: Gradient(colors: hueColors),
               startPoint: .leading,
               endPoint: .trailing)
        .mask(Text("Rainbow").font(.system(size: 100)))
Which looks something like this
Making The Modifier
This is great and all but it is not adaptive and it is also not animated. Before we start the animation let us think about what needs to happen to make a perfectly smooth loop. To do that we need to know the width of the mask. Let’s refactor our code into a new ViewModifier and call it Rainbow, but this time use a GeometryReader to grab the masks size.
struct Rainbow: ViewModifier {
    let hueColors = stride(from: 0, to: 1, by: 0.01).map {
        Color(hue: $0, saturation: 1, brightness: 1)
    }

    func body(content: Content) -> some View {
        content
            .overlay(GeometryReader { (proxy: GeometryProxy) in
                ZStack {
                    LinearGradient(gradient: Gradient(colors: self.hueColors),
                                   startPoint: .leading,
                                   endPoint: .trailing)
                        .frame(width: proxy.size.width)
                }
            })
            .mask(content)
    }
}
Explanation
The masking view is the same as the content parameter in the body function.
- We add
content - Overlay or LinearGradient which is now inside of a
GeometryReader - Modify the
frameof the gradient to be the same size as the mask - Use the content again but this time in the
maskmodifier
How To Use
Modifiers are almost always cleaner when using dot syntax to lets make a ViewExtension for this modifier
extension View {
    func rainbow() -> some View {
        self.modifier(Rainbow())
    }
}
Then apply it like so:
Text("Rainbow")
    .font(.system(size: 100))
    .rainbow()
Animating
Copy/paste our Rainbow modifier and rename it RainbowAnimation. Now we need to think about the geometry we need to make the smooth animation. Basically we need a LinearGradient that is twice the width of our mask with twice the amount of colors. The animation itself should restart when the trailing edge of the gradient reaches the trailing edge of the mask.
Break Down
Animation
I chose a duration of 4 seconds just because I thought it looked nice, you can experiment with any values you like!
Animation
      .linear(duration: 4)
      .repeatForever(autoreverses: false)
To make the animation play we create a Boolean State variable in our modifier called isOn and switch its value from false to true when the view appears.
struct RainbowAnimation: ViewModifier {
    // 1
    @State var isOn: Bool = false
    let hueColors = stride(from: 0, to: 1, by: 0.01).map {
        Color(hue: $0, saturation: 1, brightness: 1)
    }
    // 2
    var duration: Double = 4
    var animation: Animation {
        Animation
            .linear(duration: duration)
            .repeatForever(autoreverses: false)
    }

    func body(content: Content) -> some View {
    // 3
        let gradient = LinearGradient(gradient: Gradient(colors: hueColors+hueColors), startPoint: .leading, endPoint: .trailing)
        return content.overlay(GeometryReader { proxy in
            ZStack {
                gradient
    // 4
                    .frame(width: 2*proxy.size.width)
    // 5
                    .offset(x: self.isOn ? -proxy.size.width/2 : proxy.size.width/2)
            }
        })
    // 6
        .onAppear {
            withAnimation(self.animation) {
                self.isOn = true
            }
        }
        .mask(content)
    }
}
- Create the state variable with an initial value of
false - Add our animation
- Create a gradient with twice the number of colors by adding two of our
hueColorsarrays together - Double the width of the gradient
- Use a ternary operator to change the x offset from its initial position of half the masks width to the right to half the masks width to the left
- Use the on appear method to change the
isOnvalue to true using the animation we made earlier
Finally Make a View Extension for the modifier
extension View {
    func rainbowAnimation() -> some View {
        self.modifier(RainbowAnimation())
    }
}
Final Thoughts
When using a stroked shaped its a good idea to inset the shape by the same value as the line thickness. If you don’t the stroke will be cut off due to the fact that the stroke’s thickness extends past the shapes bounds.
Example
RoundedRectangle(cornerRadius: 10)
                    .inset(by: 5)
                    .stroke(Color.black, lineWidth: 5)
                    .frame(width: 300, height: 100)
                    .rainbow()